

Free tutorial courtesy of Tie Dye Diva PDF Sewing Patterns.
The Tie Dye Diva family loves to celebrate! So much so that with 3 kids, our paper Happy Birthday banner from the store was held together with tape in a few places and not looking so festive. I made this reusable fabric bunting for my youngest's second birthday and put a photo on it so he would know exactly whose special day it was without having to read a thing. The photo is in a clear vinyl pouch so it can be removed and replaced with another birthday boy or girl’s photo, name, or other greeting for non-birthday occasions.
Here’s how to make your own Photo Pocket Flag Bunting:
Makes one banner about 84" long.
You’ll need:
• 1 package (3 yards) Double Fold Bias Quilt Binding (7/8” wide)
• fabric scraps at least 6.5" x 7.5”
• 2 pieces clear vinyl 7.5” x 5.5” - I used 4 mm thickness.You can find this at any regular fabric store.
• 4" x 6" Photo of your loved one, birthday greeting or other personalized message
First, make a template out of cardboard to make cutting your flags easy. Make it 6.5” across the top, then measure down from the center point (hint: the 3.25” mark) 7.5" and mark this spot. Connect the lines to form a triangle and cut it out.


If your scrap bin looks like mine, you’ll need to press the triangles before you sew. Of course, it’s a much better idea to press before you cut but this was a nap-time project for me so I pressed later. Then I piled them into my ‘girl’ and ‘boy’ piles and just like a little fabric-flag promenade, matched one from each pile, right sides together.
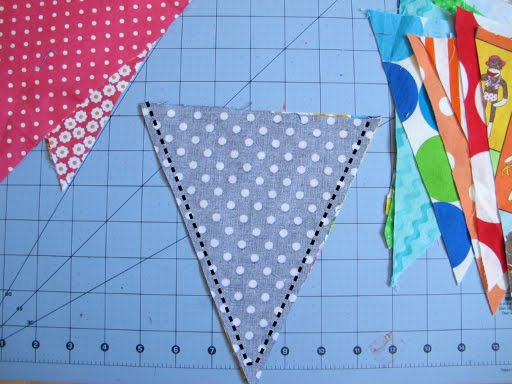
You only need to sew the two longer edges of the triangle - use a 1/4” seam allowance. For a nice point, stop a little before the tip, take 2 or 3 stitches across, then continue down the other side.

Clip the tip and then turn, poking the tip out nicely. Press again, and don’t skip it this time. It would be a nice touch to topstitch those two edges if you had the time. Repeat for all 12 flags.
Now, looking only at your ‘girl’ or ‘boy’ side, arrange them in an order you like, remembering that there will be 6 to the left of the photo and 6 to the right, so balance the two sides nicely. Then flip the whole pile over and look at the other side to make sure it looks nice too. Set your flags aside, keeping them in order.


Cut 3 pieces of your quilt binding 5.5” long and one piece 7.5” long*.
*read ahead, you may want to cut it a little longer. Keep the big piece too, that's what all your flags will hang from.

To form the photo pocket, enclose a short edge of each vinyl piece in one of your short pieces (5.5") of bias binding and sew along the edge. Here’s the great thing – no need to fear sewing on vinyl, don’t get out your Teflon walking foot or tissue paper or anything else. Your presser foot will never touch the vinyl.

See? Here’s a picture of my presser foot, not touching the vinyl at all.

Now lay these pieces with the bound edges together, this will be the opening on the side where you slide the photos in and out. Then bind BOTH of the opposite short edges together in the remaining short piece of bias binding and sew. To be clear, you're enclosing two vinyl edges in one bias tape piece.

Lastly, enclose both bottom edges and sew.

I left raw edges; I don’t intend to ever wash the bunting, and the bias would not fray much anyway. If you don’t like this look, you can cut it a little longer than 7.5” and turn each raw edge inside before you sew it.
Now find the center of your long piece of bias binding and the center of your photo pocket. Enclose the top edge of both pieces of vinyl in the bias binding and sew it down.

You can stop here and pin all your flags in place if you want to. I didn’t. I just stopped as I approached the edge of the photo pocket with my needle down, opened up the binding, and tucked the next flag in place, then stopped again near the end of the flag and tucked in another. Because we are starting in the middle, begin with flag #7 in your pile and work to the end.


Then turn the bunting around and again, begin in the middle with flag #6 and work out to the other end. If you have enough binding, you can tuck the ends inside to finish them.
I added a grommet to each end for durability.


And slid in a picture of the birthday boy.


I liked it so much, I made another for my Mom and Dad the very next day. Mom on one side ...

Dad on the other, along with wine grape, fancy car and tools fabrics!

Feel free to link to this free tutorial but do not copy the text or images or claim the tutorial as your own. You’re welcome to use buntings made from this tutorial for personal use or for sale.

4 comments:
Love this idea! I'm a bit confused, though, with the photo square. It appears as though all four sides of the two pieces of vinyl are sewn into the bias tape. I'm not clear how the photos are inserted and changed.
One one side (and also the top and bottom) of the photo pocket, the front and back vinyl pieces are both enclosed in 1 piece of bias tape. On the open side, however, the edge of each vinyl piece is enclosed in a separate piece - so there are 2 pieces of bias tape on the open side. I added two photos showing photo insertion that I hope will clarify. :)
This is a great idea! I made some fabric buntings for baby shower decorations and the mom-to-be kept them and used them in her son's nursery. The photo pocket is nice touch of personalization. It would be kinda cute to applique letters to spell out the child's name on the individual pennants.
Thank you, Tie Dye Diva! The photos made it very clear. I appreciate you adding them.
Post a Comment