Showing posts with label fast crafts. Show all posts

Tutorial:: Holiday Felt Garland

Posted Tuesday, November 27, 2012

Article by RaisingGreenKids, blog - RaisingGreenRichmondKids


Felt Garlands are a quick, easy and affordable craft that anyone can do. I have recently gone a little felt garland crazy and I wanted to share this project with all of you so that you can make your own and enjoy them too!


What you'll need:

  • A few 12x9 sheets of felt (I usually choose 3 colors but that's up to you)
  • A cut out of the size or sizes you would like your circles to be for tracing. You can make all your circles the same size or vary the sizes.
  • scissors
  • A sewing machine
  • Thread- I use heavy duty thread

Directions:

Trace your stencil onto the felt

    Cut out the circles

    Sew them together one by one making sure that the circles are close together in a pattern. Make sure you secure the start and end by stitching back and forth several times.


    If you would like to hang your garland you can add ribbon to each side. Or you can leave it as is and decorate your tree, mantle, hallway or any other place!

    Experiment with different color combinations for different occasions.  Raising Green Kids offers finished garlands in a variety of color combinations for sale in her Etsy shop if you would rather buy one than make it yourself.

    Art Project:: Bubble Wrap Fall Tree

    Posted Saturday, November 03, 2012

    Article submitted by RaisingGreenKids, blog - RaisingGreenRichmondKids

    Have your little ones create Fall trees using leftover bubble wrap. This is a fun and super easy eco-friendly craft for little ones of all ages.


    What you'll need:
    paper - heavier stock paper works best
    cut squares of bubble wrap. mine were about 4x4
    paints-yellow,red,orange,brown
    brown markers or crayons


    Directions:

    If you child is older they can draw their own tree trunk, if they are younger draw it for them.
    Put a thin layer of each color of paint on a left over lid or reusable bowl or plate.
    Show your child how to take the square of bubble wrap into their hand and dip it into the paint, then dab up and down on the paper in different spots above the tree trunk.
    Use different colors to create a fun Fall picture. Enjoy!

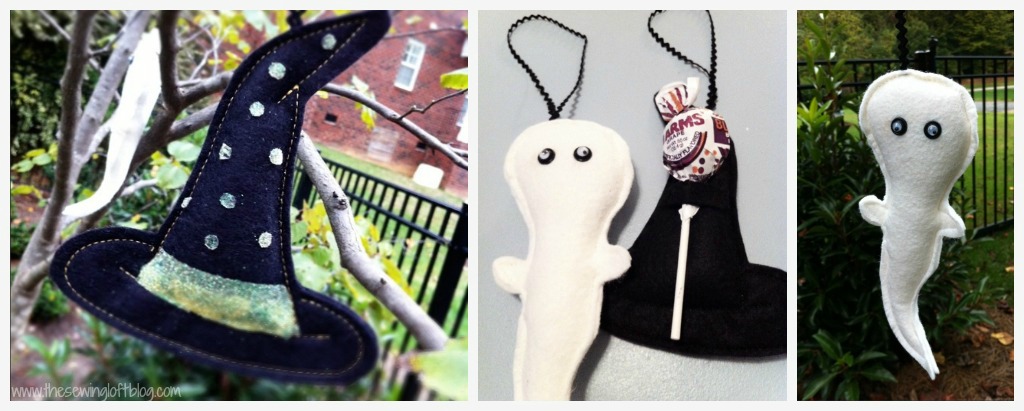
    Get Crafty with The Sewing Lofts Halloween Treat Holders

    Posted Saturday, October 27, 2012

    Looking for a way to dress-up the treats you give the special kids in your life ... the nieces and nephews, the neighbor kids, your best friends kids or your kids best friends?  EK team member Heather from TheSewingLoft shares two quick and super cute ways to dress-up suckers for Halloween.  Kids will love it and you'll love being able to whip out a bunch in no time flat!  


    Visit TheSewingLoft blog to download the pattern and get the instructions.

    Sparkling Fourth of July Fireworks Craft

    Posted Tuesday, July 03, 2012

    By Cori of Peace, Baby! Batiks

    The Fourth of July is one of my favorite holidays. I love getting together with friends or family, eating good food, and celebrating our country and its freedoms. And, I absolutely love fireworks. I’ve found lots of fun holiday-themed crafts, and I’ve tried to squeeze a couple of them in during the busy days before July 4th.

    These sparkling fireworks and quick and easy and just messy enough to be fun (but not so messy it trashes your house) – who wouldn’t love blowing air at paint through a straw? Our finished products ended up looking less like fireworks than sparkly blobs of red, white, and blue, but we had a good time making them, and they’re still really pretty.


    What you need:
    Red, white, and blue paint
    Black or blue construction paper
    Drinking straws
    Glitter

    Pour paint into small cups (I use recycled applesauce cups) and water it down so it’s thin and runny. Pour small puddles of each color onto your paper and blow at the puddles with your straw to create arms and streaks of color.


    Before the paint dries, sprinkle glitter on top of your fireworks. Set it aside to dry and try it again!


    There are tons of fun Fourth of July projects out there. Here are a few I’d like to try, if not now, then maybe for Labor Day. J

    Father’s Day Tie Bookmarks

    Posted Tuesday, June 05, 2012

    By Cori of Peace, Baby! Batiks

    Got an hour between now and Father’s Day (June 17)? Then you have time for the kids to make fun bookmarks for the dads and father figures in their lives. My husband, father, father-in-law, and grandfather all love to read, so this idea was a no-brainer for us!


    To start, I drew simple tie shapes on cardstock. I drew a triangle with rounded edges for the knot, and a long rectangle with a point at the end for the tie. I drew two per page, but I probably could have squeezed three or four on there. (I'll be the first to admit that my tie shapes are not perfect, but I think that only adds to their charm!)

    Then, I set my son to decorating with crayons and markers. The first couple were simple, but he had a great time with patterns and shapes on the last two.


    Once they were decorated, he stamped “Happy Father’s Day” onto the back of each and signed it. I dated them so the dads would remember. Then, I laminated them in clear contact paper. Add a loop or ribbon, and you’ve got a gift Dad will love!


    We’re also going to fill out one of these fun questionnaires for my husband for Father’s Day. My son is four, and I can’t wait to see what answers he comes up with. I imagine it’s going to be hysterical. I think we’ll do it every year.

    Flowers for Mom

    Posted Tuesday, May 08, 2012

    By Cori of Peace, Baby! Batiks

    Mother’s Day is just a few days away, and if the kids aren’t sure what they want to make for Mom or Grandma, this quick craft might be just the thing. She's sure to love it!


    Here’s what you’ll need:

    Cardboard egg cartons, cut into individual cups
    Paint, markers, and/or crayons
    Green pipe cleaners
    White paper
    Tape

    I started with this adorable May Day bouquet idea from Alphamom but made egg carton flowers instead. I thought it would be more fun to get messy with paint than markers. My son had a great time mixing colors, and eventually he abandoned the paint brushes and just used his hands.


    Once your flowers are dry, poke a hole in the bottom with scissors and thread the pipe cleaner through. I wound up a bit of the end inside the flower to keep it from sliding out.


    To make the basket, print out and cut the printable sheet from the Alphamom craft. Decorate the basket and handle. My son opted to create stories on the baskets with crayons and garden stickers.


    Tape the cone together and add the handle. Fill with your flowers, and watch Mom and Grandma smile!

    Ice Cube Painting

    Posted Tuesday, April 24, 2012

    By Cori of Peace, Baby! Batiks

    My son really likes to paint, so I’m always looking for different methods of painting. I don’t always want to get into the messiness of finger painting – especially indoors -- and water colors aren’t always as much fun as the bright colors of poster paint.

    I saw ice painting demonstrated one day while we were watching Sprout, and I was intrigued. I modified our activity a bit from the directions posted online, using watercolor paper instead of paper towels and cardstock. I like the heaviness of watercolor paper; it can take a lot of paint!


    The night before you want to paint, prepare your ice cubes. Put a little poster paint in the bottom of the cubes of an ice cube tray. Fill with water and mix well. Add half of a craft stick to make a handle. Pop into the freezer and let them set overnight. We’ve had success with solid colors as well as glitter paints.

    When you’re ready to paint, take the ice cube tray out of the freezer and let them sit for a few minutes before trying to get them out of the tray.


    Pull the cubes out, give each kid a piece of watercolor paper, and let them go! First, the kids rubbed the cubes on the paper.

    When they were fresh from the freezer the colors were lighter.


    Then, as the cubes thawed, the color went on thicker and darker.


    Then, the boys discovered pieces of the ice cubes fell off if you hit them on the paper or pressed them like a stamp. By the end, we had soaking wet, colorful pieces of art!


    Variation: In honor of Earth day, I made green, blue, white, and silver glitter (just for fun!) paint cubes and cut our watercolor paper into circles.


    My son discovered it was fun to paint his hand and then stamp it onto the paper.


    My son told me his painting shows Earth right after it was formed. (He’s a bit of a space and planet nut.) Mine shows Earth later in its developmen, or so he tells me. J


    Hippity Hoppity Paper Bag Frog Puppets

    Posted Tuesday, March 27, 2012

    By Cori of Peace, Baby! Batiks

    Here’s an easy activity perfect for spring days when you’ve got just a little time for an activity: paper bag frog puppets! Even better, chances are pretty good you’ve already got everything you need:

    Lunch-size brown paper bag
    Green construction paper
    Red construction paper
    Googly eyes (the bigger the better!)
    Glue


    My inspiration came from this blog post. We made our frog puppets on Feb. 29 (aka, Leap Day) and paired them with a few of the Froggy books by author Jonathan London and illustrator Frank Remkiewicz. But, I think you’ll find this is great for any spring day or even an “F”-themed day – especially if you’ve got a good place to go looking for frogs!

    First, you’ll need some basic shapes:

    Two strips of green paper that are rounded on one end for eyes
    Two green arms
    Two green legs
    Several green circles
    A long red tongue

    Depending on the age of your kids, you can either precut these shapes or trace them onto construction paper and let them do the cutting.

    Glue the googly eyes onto the eye strips and fold under the bottom (non-round) end. Glue to the base of your paper bag.


    Glue the eyes and legs inside the side folds of your paper bag. Glue the tongue under the bottom of the bag.


    Last, glue the green dots all over your frog. Put your hand inside and start hopping!

    Related Posts Plugin for WordPress, Blogger...