Kanzashi flowers are a Japanese art form that are traditionally made with honotai silk. Kanzashi are typically worn as decorative hair ornaments in traditional Japanese hairstyles. Use your kanzashi flowers on hair clips or headbands as they were traditionally worn by geishas. Or put them on hats, jackets or tshirts. You can also make kanzashi flowers out of paper. Make a sweet bouquet or wreath.
Fabric (preferably a woven one that is thicker material)
Scissors or rotary cutter
Ruler or cutting guide
Iron and board
Straight pins
Needle and thread
Hot glue gun or fabric glue
Buttons, beads, embellishments
Cut your fabric into 4" squares. I recommend 3" ones if your going to use them for girl's hair accessories, but I'm making mine to embellish hats. Each square is one petal of your flower and each flower needs 5 petals.
Use your iron to press each square in half to make a triangle.
Next you're going to fold your petals. You will want to have your pins close by. With the top of your triangle pointing away from you, fold the left corner up to the top, bisecting it in half.
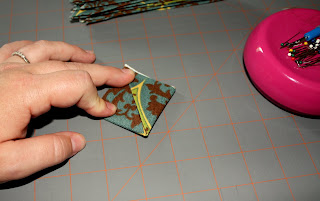
Then fold the right corner up to meet the left one, making a smaller square. Holding those folds in place, flip your new small square over keeping the raw fabric edges facing away from you so it is oriented like a diamond.
Fold the left and right corners evenly towards each other so that they touch and meet in the middle.
Fold the fabric together from right to left, sandwiching the points in the center.
Use a straight pin to push through your petal sandwich in the center, making sure to catch the 2 points in the middle.
Repeat the process until all your petals are folded and ready.
Using a sharp pair of scissors, cut the raw edged tail off of your petals. You want to cut close to the pin, but not exactly on top of it. Do not remove the pins yet.
Using your first cut petal as a guide, cut the rest of your petals so that they are the same length.
Use your needle and thread to sew 5 petals together. You want the needle to pass through where your pin is, so that it runs through all the folds and the center points sandwiched inside the petal. Remove the straight pins as you insert the needle.
I usually stack all 5 petals on the needle at once to keep the petals folded and then use a pair of pliers to pull the needle through all the layers of fabric. Then tie a knot to secure a loop of thread. You do not want to tie your loop tightly, otherwise you will not be able to position your petals and open them up properly.
Move your petals around so that they are in a flower shape. Use your thumb to press open the outer point of each petal.
Using your hot glue or fabric glue, put a small amount of glue between each petal to keep the petals from shifting around too much when in use. I also put some glue into the center of the petals from the back side of the flower. Next use a button, beads, covered button, or other embellishment to attach to the center of your kanzashi flower. I sew beads onto felt cut with pinking sheers for these flowers.
I'd love to see pics of what ever you make. Email them to thatmoxiegirl@gmail.com
Shared by: That Moxie Girl
Etsy shop: www.thatmoxiegirl.etsy.com
Facebook: www.facebook.com/thatmoxiegirldesigns
Blog: www.blog.twocrazypirates.com


3 comments:
love this tutorial...i'll definitely be making some of these!!! Grazie!
Thank you! They are easy to make with some practice and great to use up scraps with!
Those flowers are so cute! My daughter would love them. I'll have to give them a try.
I'd love for you to link up and share: http://tutusandteaparties.blogspot.com/search/label/Link%20Party
Post a Comment