Wednesday, February 29, 2012

EtsyKids Design Challenge: We have a Winner!

Congratulations to the winner of our February's challenge, Marabou Bunnies, 8x10 (set of 2) by ElizabethLaurenArt!


Elizabeth Lauren Art specializes in custom imaginative paintings for nurseries, children's rooms and playrooms.  Creating that one of a kind design for your one of a kind child.  You can view more of Elizabeth's work right here.


Tuesday, February 28, 2012

March 2012 EtsyKids Desktop Background

Here is the desktop calendar for March 2012! This month the theme was pastels and spring with lots of calm happy colours! You can see a treasury of all these items here.

1024 x 768

1280 x 800

1920 x 1080

Saturday, February 25, 2012

Toddler Sensory Activity

From Christine of Belly Bear Baby Gear


If you are the proud parent or family member of a toddler, you know all too well that they are constantly exploring the world around them using their senses. Particularly their senses of touch and taste! With this quick and easy activity, you will be able to allow your toddlers to safely have a new tactile experience.


All you will need are a few common household items: a ziploc bag (any size), food coloring, duct tape and good old fashioned foam shaving cream.
Once you have gathered all the necessary ingredients it is time to begin!

Squirt enough shaving cream into the ziploc bag to fill one corner of the bag. A little bit goes a long way. Too much shaving cream will make the bag too fluffy. Then add 2-3 drops of food coloring.


Here's where the fun begins. Seal the bag attempting to force as much air as possible out as you completely close the ziploc bag. Now it's your turn to enjoy this experience before your children. Gently massage the shaving cream and food coloring in the bag to create a cohesive color. If you feel like sharing, you can involve your children in this step as well :)


Your bag is now ready to adhere to a flat surface. For this application I used the duct tape to hang these bags to my refrigerator. One of my children's favorite places to play. This also works well on a child's sized table. You may choose to only attach the bag with duct tape a the top or duct tape all four sides. Be aware that if you only duct tape the top, chances are your resourceful toddler will quickly have this activity removed from the surface you have taped it to!


If you have preschool age children and are feeling brave, this activity can also been done without the bag (toddlers will eat the mixture without the bag) on a table top or in a tray. This will be messy, but the amount of fun your child will have makes the clean up worth it. If doing this activity without the plastic bag I would recommend using liquid water color paint rather than food coloring to avoid staining. 


As a side note, shaving cream does an amazing job of cleaning children's marker and crayon markings off of table tops. If you find yourself with a table covered with stray marks, give your preschooler some shaving cream and let them go to town. You will be amazed at how the marks disappear when it is time to wipe the shaving cream off with a damp sponge.

*As always, never leave your child unattended with this activity. Toddler teeth are always looking for something new to bite and they will most certainly chew right through the bag posing a health hazard to themselves.

Enjoy this experience with your toddler. Watch how the shaving cream mushes and moves as they manipulate the bag.

Thursday, February 23, 2012

Introducing Royal Baby Youngblood

Today We Introduce You to Anissa from Royal Baby Youngblood


Q: what motivated you to start your shop?
I have always been pretty creative by spending my free time knitting and sewing. A few years ago I knitted a bunch of baby hats for a friend of mine, who is a photographer, and she suggested that I sell them on ETSY.

Q: what is the story behind your shop name?
I always thought of my two daughters as princesses and I apply this idea that everyone’s precious child is Royalty (hence Royal Baby Youngblood). Youngblood is our family name so it fits right into the theme.

Q: do you have a favorite Etsy Shop (non-child related)?
I really enjoy the whimsical fabric prints of SherriFairy. http://www.etsy.com/shop/sherrifairy?ref=seller_info

Q: what surprised you most about having your own craft / online shop?
I had a little bit of apprehension and doubt about selling on-line. I wondered if people would love and buy my products and thankfully I have been able to sell.

Q: what do you find most challenging about being an Etsy seller?
Keeping enough items stocked and finding time to balance designing and producing.

Q: what's your personal philosophy behind your shop / products?
My philosophy is to create fun and colorful items for children that are of heirloom quality. It’s traditional to buy pastels baby items, but I think the right bold color combinations and softer textures are more important.

Q: how would someone (other then you) describe you?
I think people see me as a creative busy body.

Q: what music do you have on while you are creating?
I like to listen to Jazz and Gospel music, but I mostly have the Food Channel on while I’m working. I guess that’s my other creative side.

Q: what do you do when you aren't working?
I am usually napping when I’m not working, because I push myself to exhaustion by crafting until the wee hours of the morning.

Q: anything else you'd like to tell us or share?
I love to share what I create. I think it’s an expression of love.

Tuesday, February 21, 2012

EtsyKids Design Challenge: It's time to Vote!

It's time to vote for your favorite item! Voting will be open until February 27th. This month, EtsyKids members were challenged to create an exciting new item based on a theme "Spring has Sprung". We received a bunch of fantastic entries from some talented people. Please vote for your favorite item from the list below.

Sunday, February 19, 2012

Saving Money on Monthly Expenses

Today we have a guest post from Sweet Child of Mine.
For many people at the moment money can be a difficult issue, and Erin from Sweet Child of Mine has some really useful tips to make that money go a bit further. 

I've shared tips for saving money on groceries, online shopping and entertainment, now I'm going to give you a glimpse into how my family saves money on our regular monthly expenses. First I want to clarify that this is what works for us. It may not work for every family. We all have our things that we can't (or don't want to) do without, and that's fine.

1. Cell phone- We had a phone through AT&T that we were paying about $45/month for. The cell phone is primarily used by my husband to call home when he's working. We were not using all of our minutes, and even the cheapest plan was way more minutes than we needed. I switched us to Tracfone, and we are now paying about $6 per month for two phones (although one phone is out of minutes so we are only using one phone right now). The service is just as good as AT&T.

So far the hardest thing has been getting family to stop calling our cell phones when we are at home, but after a few times of not answering the cell then calling them back from our home phone, they are catching on. Especially since we tend to not even turn the cell phone on (or even remember to bring it into the house) when we're home.

Now Tracfone might not work for a lot of people, especially if you don't have a home phone or if you use your phone for texting or surfing the web. You might want to take a few minutes to check outBill Shrink to see if your cell phone plan is the best for your particular usage needs.


2. Internet- We switched from Time Warner to Clear and are saving $10 per month. It may not sound like much, but it's $120 per year, plus we can take our modem with us anywhere. I know I'm going to love this next month when we go on vacation b/c I'm not going to be searching all over for free WiFi. I have not noticed any difference in the speed of Clear versus RoadRunner. They are not in every city yet, so you can check availability here. Be sure to type in your address, because the coverage map seems to only show big cities. Or if you really want to save money, you could cancel your internet all together and go to the library. This is not something I'm willing to do, as internet is one of my non-negotiables. I justify the expense though because I have an online business and our home phone service requires the internet.


3. Home phone- We use a Magic Jack for our home phone service. If you've never heard of it, the Magic Jack is a device that you plug into a USB port on your computer, then you plug your phone into it just like you would a normal phone jack. The device is $19.99 and service is $19.99 per year (or cheaper if you buy 5 years at once). Since calls go through your high speed internet connection, there's aren't taxes and usage fees added in. I was paying AT&T $25 per month just for local phone service without and extras like caller ID, call waiting or voicemail. For $19.99 (or less) per year you get unlimited local and long distance calling, caller ID, and voicemail. There are occasional glitches (which are probably caused by my computer) but I've always been able to fix them by restarting my computer. The occasional glitch is a small price to pay for such savings. The other downside is that the phone service only works if your computer in on, so you need to keep your computer on. This isn't a problem for us, because our computer is on most of the day anyway. We are saving over $280 per year and aren't adding to our electricity costs since our computer was on most of the time anyway. You would have to figure for yourself if it would be worth it, but I'm guessing it would not cost an extra $23 per month to keep your computer on, especially if you work full time and aren't home all day anyway.


4. Utilities- I try to conserve energy in any way I can. In the summer, we keep our thermostat at 75, and in the winter I try to keep it around 67 and dress warmer. I say try because my husband is constantly turning it up. At night, I turn it down even lower. The kids and I sleep in the same room, so I close the door and use an electric heater (I follow all safety guidelines, plus our heater has an alarm that goes off it it gets too hot). I only do the laundry if there is enough for a full load (who am I kidding, there's always enough). I would love to use a clothesline when it's warm to save even more- that's on our to-do list. Our computer and TV (+dvd player, converter box and antenna) are plugged into surge protectors which are turned off when not in use to save energy.


5. Baby Care- This is not meant to start a debate, but I breastfeed, which has saved us a ton. Also, I followed the AAP guidelines and did not give my kids solid foods before 6 months of age, which also saved us money. When my kids did start eating solids, I didn't bother with the processed, packaged baby foods. I just gave them whatever the rest of us were eating (Isn't that what kids want anyway?). It's way cheaper than the jars of baby food and it's less work! I also use cloth diapers. I used disposables on my daughter for the first 6 months, and spent $50 per month. I've spent a total of $400 on cloth diapers and have so far gotten about 51 months of use out of them between my 2 kids, so that's a savings of $2150 so far. If I have 2 more kids like I want, that's approximately $3600 in additional savings. Yes, there is the additional cost of the extra load of laundry per week, but since our water bill is only $40 every quarter I can't imagine that 1 extra load each week is adding much. Plus I'm still assuming the $50/month for disposables that I paid in 2006 and I'm sure diapers have gone up in cost like everything else. I'm also not factoring in gas money to buy diapers, because I'm sure there would be times that I would have to make trips to the store specifically for diapers. I'll stop there, because this post isn't meant to convince anybody to switch to cloth diapers, just to share what has worked for my family.


6. Gardening- I don't have any hard numbers here. I'm not sure exactly how much money gardening has saved us, but I know from July-October I don't buy tomatoes. This year I plan on canning a ton. Even if my own garden doesn't produce enough, I plan on shopping the farmers markets and even the grocery stores while produce is in season to stock up and can at the cheapest prices. Plus I'm really hoping our peppers do better because they are expensive in the winter!


7. Gym- We pay $50/month for our YMCA family membership, which is cheaper than the other gyms on the area. The Y also offers free or discounted memberships based on financial need. Some people may be able to completely do without a gym membership, but this is one thing I refuse to give up! As a work-at-home mom, I need my "me" time in the form of Zumba classes! Plus my 4 year-old loves her daycare time, and she's starting soccer tomorrow.


8. Cable- We don't have it! The only "must watch" show for us that we can't get on regular TV is Burn Notice. We just watch it on the network's website the next day.


9. Meal planning- We eat most of our meals at home. Planning meals ahead of time helps me to save money on groceries, because I try to plan meals around what I already have on hand (which I've usually paid next to nothing for int he first place). Since I already know what we're going to have for dinner, there isn't an impulse to go out to eat. This is not to say I've never had a rough day and said, "Screw it- we're ordering pizza." The majority of the time though, we eat home cooked meals.


10. Vehicles- We buy our vehicles used and don't have a payment. Of course with how much gas costs, it feels like we're making a car payment.


So there are 10 ways that my family saves money each month. Some might work for you, some might not. The important thing is to be flexible and reasonable, because there's no point in being frugal if it's making you miserable. But if you think you can scale back and live without somethings for a while, then it's worth a try. I remind myself that by saving now and paying off debt, we will be able to enjoy some of the extras in the future!

Saturday, February 18, 2012

Do-It-Yourself Kits

We all value giving, receiving and using handmade.  These EtsyKids Team Members recognize that some customers want to be able to make it themselves, but don't want the added expense and hassle of collecting the supplies.  The beauty of the DIY Kit is the seller collects all the needed supplies taking advantage of wholesale prices, bulk discounts, things you could never do when only making one or two.  They then ship you the supplies and instructions for assembling the product.  

Here are some great examples of DIY Kits available from EtsyKids Team Members.  


Friday, February 17, 2012

Snowman in a Baggie

By Cori of Peace, Baby! Batiks

Here in my part of Maryland, we've had more 60-degree days this winter than we’ve had inches of snow, and it’s making me homesick for the winters of my childhood in Northern New York State. My son is missing the snow, too, and he hasn't really had a chance to make a snowman.

So, I was excited to find this cute snowman craft on Pinterest (where all my good ideas come from lately!). Whether you’ve had enough snow or are still waiting for flakes to fall, these are an easy way to pass some time, and they last long enough to be played with for a couple of days.


You’ll need:
Can of shaving cream
Zip-top baggie
Black construction paper or craft foam
Orange craft foam Glitter (optional)


Cut enough “coal” pieces for each snowman’s eyes and mouth or ask the kids to cut them. I used a circle punch to make my coal pieces and then ran them through a Xyron sticker maker, but you can also use sticky-back foam or glue to hold your eyes on. Cut triangle “carrots” from the craft foam, one for each snowman.

Give each kid a baggie. Attach the eyes and mouth pieces onto the front. Inside, put the carrot nose and some glitter, if using. Squirt a generous dollop of shaving cream into the bag and seal, squeezing out some of the air. I taped the bags shut with packing tape.


Now, get to squishing! See if the kids can line up their snowman’s nose in the proper place on the snowman’s face. Little kids and adults will love the way the shaving cream feels as they squish the bag. The shaving cream will break down after several days, but you can expect to get a couple of days of play out of this guy.


Here’s my son’s finished snowman:

Thursday, February 16, 2012

Introducing Boorashka

Today We Introduce You to Svitlana from Boorashka!


Q: What motivated you to start your shop?
I've been working for banks for about 8 years before starting my craft business. There were a lot of papers, files, manuals in my life, and so few chances to create something new and unique. When I left office to give birth I found a lot of time to realize my craft ideas. The process appeared breathtaking, and soon I found out that other people loved my creations and were ready to pay for them – so I needed some place to sell this. Etsy became the ideal platform for selling my handmade work – it was comfortable for a newbie, had plenty of tools for development and promotion, for successful collaboration with other crafters and artists throughout the world.

Q: What is the story behind your shop name?
My shop name – boorashka – is a hint about popular character in Russian children's literature and animated films, Cheburashka. According to the story, Cheburashka is a funny little creature, unknown to science, he is a little bit naive and very kind.

Q: Do you have a favorite Etsy Shop (non-child related)?
I have a bunch of favorite shops with different goods and styles, but I'd like to feature two talented Ukrainian girls. I adore felted things by Lena Baymut http://www.etsy.com/shop/Baymut – they are expressive and practical at the same time, beautiful and cozy. Hand embroidered pieces by Natalka http://www.etsy.com/shop/skrynka are clever, honest and elegant. I've learned a lot from these remarkable crafters.

Q: What surprised you most about having your own craft / online shop?
Every day brings various surprises, maybe it is a surprise itself. Some necklaces are more demanded than others – we know the 80-20 rule, 20% of work produces 80% or more of results, and choice of a buyer is definitely surprising sometimes. Collaborative work with teammates from other countries is enthralling and full of surprises. Detailed and comprehensive feedback from a satisfied customer, and inclusion on Etsy's front page of course... Sometimes not so pleasant things happen too – postal delays, for example – but good surprises are prevailing.

Q: What do you find most challenging about being an Etsy seller?
At the moment my serious challenge is finding a balance between making simple, in demand pieces vs. creating something really new and unique. The first way is more safe, the second one may cause a lot of time and effort to be wasted, but... I definitely want to make something beautiful and practical, something that is not only pretty but also be useful.

Q: What's your personal philosophy behind your shop / products?
My products must be safe, sustainable and aesthetic. Otherwise they are not worth the time and effort.

Q: How would someone (other then you) describe you?
Active, expressive, bouncy. I hope so.

Q: What music do you have on while you are creating?
Light jazz or nature sounds. More energetic music may draw me away.

Q: What do you do when you aren't working?
Mostly walking and playing with my daughter, cooking. Promising myself to start my yoga exercises and to revive blogging.

Q: Please tell us a little about the children's items market / handmade movement in your Country?
Ukraine has been famous for its gifted crafters since olden times. I’m really happy that owing to modern communications technology, Internet and Etsy particularly we can share our creativeness with the whole world. It is really great and challenging.

Wednesday, February 15, 2012

EtsyKids Design Challenge for February: Spring has Sprung

Image via Flickr: Spring Leaves
"Spring has Sprung" is our challenge for February, picked by our last month's winner LittleTrendsBoutique. Spring will be here before we know it!  This month we are looking for items with hints of spring.  Fresh, light, airy, spring buds and flowers, birds, rain... 
EtsyKids members will have until February 20th to submit their entries, and voting will be open to everybody from February 21st to February 27th. So, be sure to come back to the EtsyKids blog for a new post on the 21st to see all of the entries and VOTE!  In the meantime, please click here to get a sneak peek at some exciting entries so far!

Saturday, February 11, 2012

Love Letter's with The Sewing Loft

Paper, fabric and sewing are definitely my vices, use them in a cute project and you'll see my entire afternoon schedule change so I can dive right in and make it.

This is absolutely how I felt when I saw  Heather of TheSewingLoft's adorable project for LOVE LETTERS, sweet embellished paper envelopes filled with candy, earlier this month, and she's sharing the instructions with us today.  So grab some scrapbook papers, your sewing machine and some tiny candies and we'll spend the afternoon making these, okay? ... cause you and I will need dozens to pass around Valentines Day don't you think!


Here's what you'll need::

* solid, embossed and printed papers in reds and pinks for Valentine's Day
* little candies like M&Ms or Sweet Tarts
* parchment paper (kitchen) or vellum (scrapbooking)


Basic Instructions:
  1. To form your envelopes, cut paper and parchment into 4″ x 5.5″ rectangles. You'll get 4 rectangles from one sheet of 8x11 paper and 6 from a sheet of 12x12
  2. For the stamps, cut paper of choice into 1″ x 1″.
  3. Position stamp in upper right hand corner of paper along the 5.5" edge and stitch all around edge stitch.
  4. Stitch some fun straight or squiggly lines to represent the cancelled postage.  If needed, lightly draw these lines with a pencil 1st and then stitch over them.
  5. With your machine or marker, add some fun words like XOXO, Romeo, Cutie Pie, Hugs and Kisses, Sweet Thing, Heart Throb, etc. to the letter where the address goes.
  6. Match up your embellished envelope with parchment paper, wrong sides together and straight stitch around 3 sides - one short and both long - to form a “pocket”.  Fill the pocket with small candies.  Be careful - overfilling will make the pocket hard to close and may cause the papers to rip.
  7. Stitch up the opening, trim any loose threads and you are set!

A special thanks to Heather for sharing this project with us.  Visit Heather's blog for more fast and easy projects for handmade Valentine gifts at TheSewingLoftBlog. You can also follow her on Facebook at TheSewingLoftFB.

Friday, February 10, 2012

Valentine's Day is for the Birds! - Bird feeder tutorial.

Today we have a guest post from Mia4Art!!

A fun craft for my preschooler: Valentine Bird Feeder

Materials: cardboard, shortening, pen, scissors, glue gun or glue, bird seed & ribbon

Cut out two rectangular pieces of cardboard. Place three points on each piece of cardboard in order for your preschooler to create a heart line drawing. The two points at the top form the letter V.
I instructed my daughter to make the letter C and backward C to connect the V to the bottom dot. A pen or crayon would be best for this.

After cutting out this heart, help your preschooler use this heart to trace onto second piece of cardboard.
After tracing, cut out second heart.


After cutting the two hearts out for your preschooler, fold the ribbon in half and place at top of heart about an inch down. Put glue over the heart and part of the ribbon. Place the second heart ontop like a sandwich.

Your preschooler will enjoy spreading the shortening on both sides of their heart! "Spread the Love!"

After spreading the shortening, have your preschooler dip their cardboard hearts into a plate of birdseed. Using their fingers they can sprinkle any areas that are empty.

Lastly, go outside and select a winter tree to share the warmth of Valentine's Day!
My daugher loves peeking outside of her window to check to see if any birds have come to visit!


Thursday, February 09, 2012

Introducing Art by Laurie

Today we introduce you to Laurie of Art by Laurie!


Q: What motivated you to start your shop?
I had mainly been painting commissioned portraits for most of my career. Although I realize how fortunate I am to have made a career from this, I now have the opportunity to expand, paint not only stranger’s faces but whatever I wish. Etsy has given me an outlet to show this work, and to see if there is an interest in my new endeavor.

Q: What is the story behind your shop name?
“Art by Laurie”, although not the cleverest of names, does convey the idea that there is a variety of subject matter. My website “Portraits and Pastels”: http://www.laurieportraits.net/ is the website where I showcased a sampling of my portraits and artwork.

Q: Do you have a favorite Etsy Shop (non-child related)
This is a hard one; there are so many wonderful Etsy shops. I love the shops that feature well crafted and unique designs. This shop, Radiant originals by Julie Campbell, is an example: http://www.etsy.com/shop/radiantoriginals

Q: What surprised you most about having your own craft / online shop?
I didn’t realize how much fun it would be! I have found a connection with so many like minded people from all over the world. There is a genuine camaraderie between Etsy sellers. There is a friendship and a desire to help each other.

Q: What do you find most challenging about being an Etsy seller?
Creating fresh new ideas for paintings that both I can be proud of and that hold an appeal for others.

Q: What's your personal philosophy behind your shop / products?
I draw on my memories and experiences to try and create a story or a connection between the subjects in many of my paintings. There are many paintings about the children in my life. In other pieces I try to give images that create a nostalgic moment or a pleasant memory.

Q: How would someone (other then you) describe you?
Perhaps a little quirky, but I hope I am thought of as kind.

Q: What music do you have on while you are creating?
Well performed music from almost every genre, depending on my mood. From opera crossovers like Andrea Bocelli and Sarah Brightman, all the way over to country music like Zac Brown Band and The Band Perry.

Q: What do you do when you aren't working?
Now that my children have grown and deserted the nest, I enjoy taking day trips with friends, working on my home and garden (Whatever the deer leave for me) and helping out at the hospital ER.

Q: Anything else you'd like to tell us or share?
Without trying to sound like schmoozing, I truly feel that Etsy is a well run, professional website. There is many forms of help and easy to understand quides. All and all I have had a great experience here so far.


Wednesday, February 08, 2012

Valentine's in a HURRY!

Still looking for the perfect Valentine's for the kids to take to school or to mail family and friends?  Here are five EtsyKids Team Members who offer custom personalized Valentine's that you print yourself!  They will email you a digital file you can print yourself!  Quick, simple and oh so affordable!  


♥  ♥  ♥  ♥  ♥

Looking for more than just a card for Valentine's Day?  Lots of EtsyKids Team Shops have top quality Valentine gifts made up and ready to ship out to you today.  See what we have to offer here

Tuesday, February 07, 2012

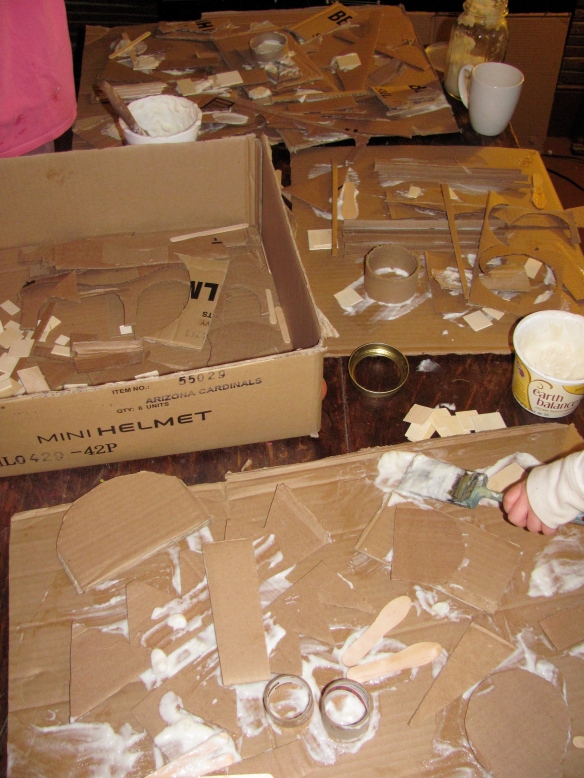
Cardboard artwork with the kids

Today we have a guest post from Amber of AmberParis.
She is sharing a fun activie to do with your kids and all you need is cardboard and lots of glue!
start with lots of cardboard…one large piece to serve as the base/canvas and many many smaller scraps cut/ripped down. I cut a lot of strips with a paper cutter and also cut several piles of squares, circles and triangles. I also gathered some various thin wood odds and bits to incorporate. and some empty ribbon spools.

add a big container of homemade paste…we mixed some elmer’s into ours to give it a bit of extra hold.

we looked at some of louise nevelson’s work prior to this project, but I didn’t give the kids any instructions beyond letting them know they had to put paste down EACH time they added something new to the piece…my 3yo had trouble remembering this step…but in the end, the paste was a sculptural element in its own right!
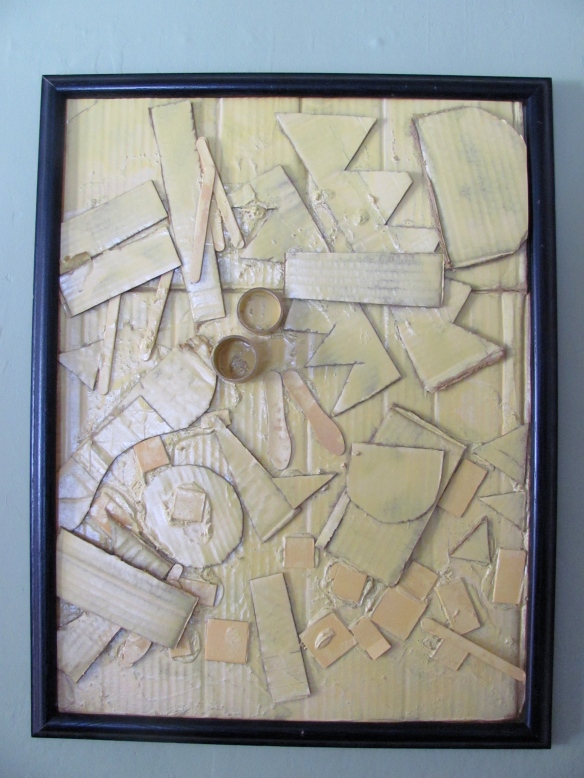
once your kids are happy with their piece and/or tire of art making, set the art works somewhere safe to dry for several days.it took nearly a week for ours to dry, but the paste was also inches-thick in areas!

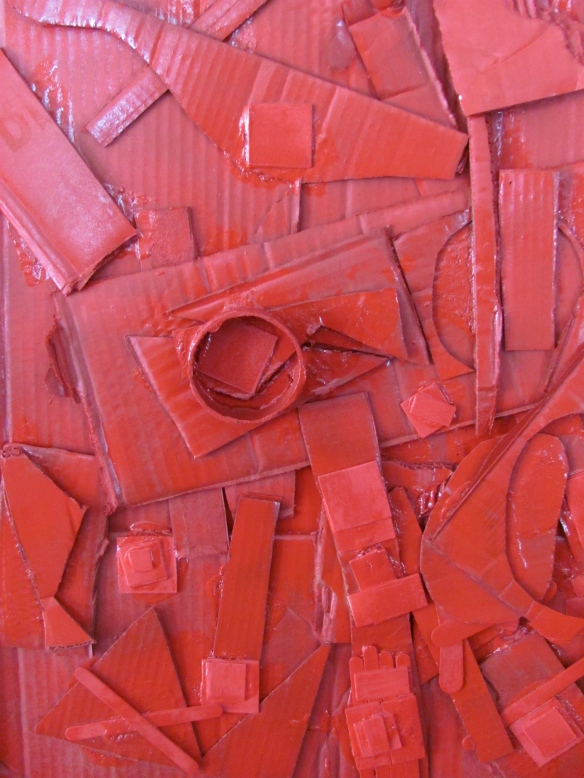
now it’s time to shop for spray paint! my kids only got to “shop” through my selection of colors in my studio, but a trip to the hardware store to choose from the many colors out there would be fun!
 
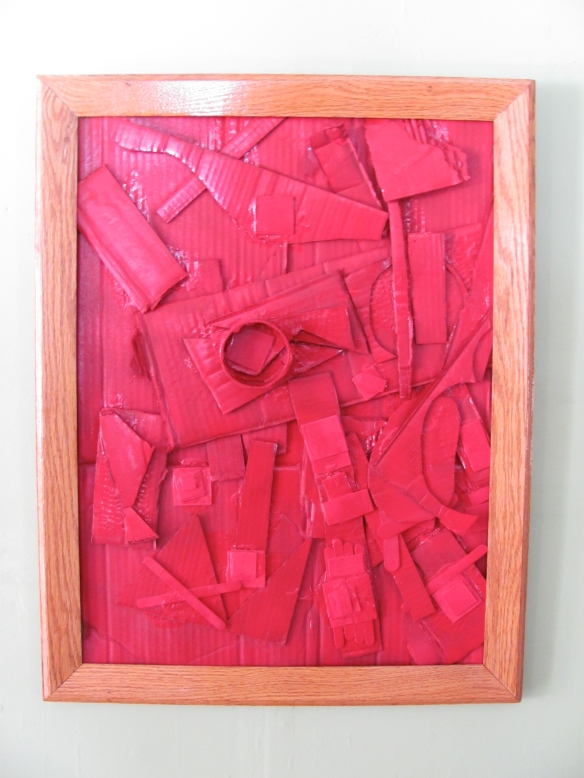
give the pieces a good coat or two of spray paint and then allow to dry thoroughly. we loved ours so much, we framed them to hang in our living room!
 

When Amber is not having loads of fun with her kids she is sewing and making fun felt play food! She sells the yummy enough to eat felt food in her etsy shop.